Have a question? Check out our FAQ. PixKix is an experimental photo sharing app which is still in development. We wanted to release it to the app store so more people could play with it but it's not actually "released" as a final product so please don't post any reviews of this app since you will be wasting your time reviewing a free experimental app. Send any comments, ideas or feedback you have to info@technemedia.com. —Thanks A good approach to exploring PixKix begins with downloading Presets from the Community. Access these by touching the PixKix is played in two different ways:
Lift finger to stop playing in regular mode. Bottom Tool Bar
Other Home Screen Icons
Use this panel to control Autoplay settings, Sensitivity and Color Mode or to access Credits and Instructions using the (i) button up top (which you obviously already did!).
Autoplay Type:
Autoplay Jump: Use this to control how far the autoplay stylus moves on each beat value. In circular mode, it jumps further around the oval the higher the numbers. Use + and - to adjust jump while playing. Sensitivity: this controls how PixKix reacts to "new " colors. When sensitivity is low, it takes a more drastic color change to cause new musical notes to trigger so it has the effect of sustaining notes more often. Presets may change the sensitivity in ways that can't be adjusted manually. Color Mode: This controls how PixKix interprets color information. When in RGB Mode, Red, Green and Blue voices interact according to relative brightness of these components. In Hue Mode PixKix uses the Hue to control the notes so it interprets the color spectrum in a pure way where Red is low and Violet is high. The music produced in Hue Mode tends to be simpler and RGB is best in most situations but it really depends on the image. Use this panel to select one of the stock gallery images or select a photo from your Photo Library or Take a Picture and play it immediately. You can also go to your normal camera and take pictures that can be played in PixKix. Presets are a combination of image, musical settings and sounds you've recorded. Tapping the Presets icon on the home screen will take you to the Presets Panel. To scroll to other preset pages, swipe side to side or tap the page gadget at bottom. To Manage new or old Presets, tap on the Folder icon on the top bar. You can replace a Preset with your current settings by selecting on an existing Preset in the scrolling list. Once a Preset is selected you can also delete it, post it to the Community or Email it.
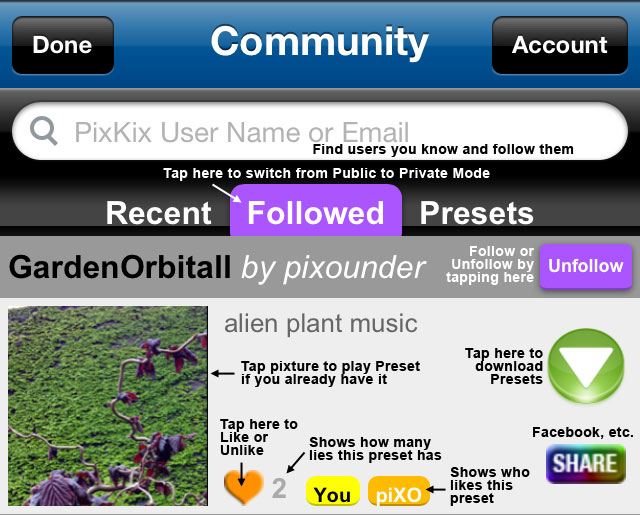
Once you create a unique User Name and provide a Password and Email Address, you wil be able to post presets to the PixKix Community. Because this is not only a friend network but a Global Community, Public Presets must be first approved by Techné Media before they are released. Once in the community, a preset can be accessed by thousands of users around the world! Private Presets can be only be seen by those who are following you. If you never post a public preset, then users will need to know your User Name or email address to Follow you, otherwise they can do so on your public presets. If you like a preset and want to let others know about it, use the Share button to post a link to your social network of choice. Only people who have PixKix will be able to download the preset of course...but it's free so they should download the app for sure! When you tap the Download Arrow on a preset it is then stored in your local preset collection where you can delete it later if desired. Unlike other picture sharing apps, this offers interactive sound so it can't just be shown and has to be downloaded to work.
The more Likes a preset gets, the deeper red the color gets and then it even starts to turn purple and beyond. Friends of yours (those you've followed or are following you) appear in colored shapes to the right of the heart. The more of your presets they like, the deeper shade of red their name will appear. This gives you an idea of which of your presets are most popular with which users. The slide-out transparent Piano is primarily used for transposing the current key. You can change the active Octave of this keyboard by touching the Arrows on either end. If you touch them without sliding your finger, the keyboard octave changes and you will see the current octave on the lower left where Middle C is 4. However, the actual key change won't take place until you touch a key on the piano. To instantly change octaves in the same key, Slide your finger up after you touch the arrow. Prompts When you first start using PixKix, it will give you some guidance at the top of the screen. Just tap on the prompt to make it disappear. It will stop prompting you as you gain more experience. Make Regular Back-ups Make sure to back up your phone and its data regularly, especially when you do software updates. This way any settings you have saved as presets will be preserved. You can also backup your settings by emailing them to yourself or posting them to the Community. Troubleshooting No sound: Make sure phone volume is up and switched into non-silent mode if not using headphones (not recommended). Restart PixKix: If you get a hung note (sorry), you may need to restart PixKix. Go to home screen and double-click home button. Scroll to PixKix icon in bar that appears and hold finger on icon until X appears to Close App. PixKix Updates and Other Versions Keep an eye on your app updates as we anticipate making regular improvements to PixKix. If you like PixKix, you'll probably like Pixound even more! Techné Media has plans for several other mind-blowing Apps so keep checking on occasion. Thanks! Techné Media — The Science of Art™ |